When I had to re-create my blog installation I had to make a choice on whether I wanted to
- Fully host it myself (business as usual…)
- Find it as a full managed service (SaaS) somewhere
- Find a suitable virtual server (IaaS or PaaS) somewhere
The first option was easily dismissed as my home cupboard does not provide much in terms of reliability (which already has proven fatal for earlier versions of the site).
The second option would hardly satisfy my need as I usually wants to tweak and hack the system a bit in order for it to behave the way I wanted (more on this below).
I chose to go with the last option and am now running in the warm comforts of AWS cloud. I did not want to setup the entire stack of IaaS, instead I went with a pseudo PaaS, known as LightSail, where a virtual server deployed with a pre-configured Ubuntu/Wordpress (from Bitnami) is setup. You still maintain access to the OS though (which I will cover reasons for).
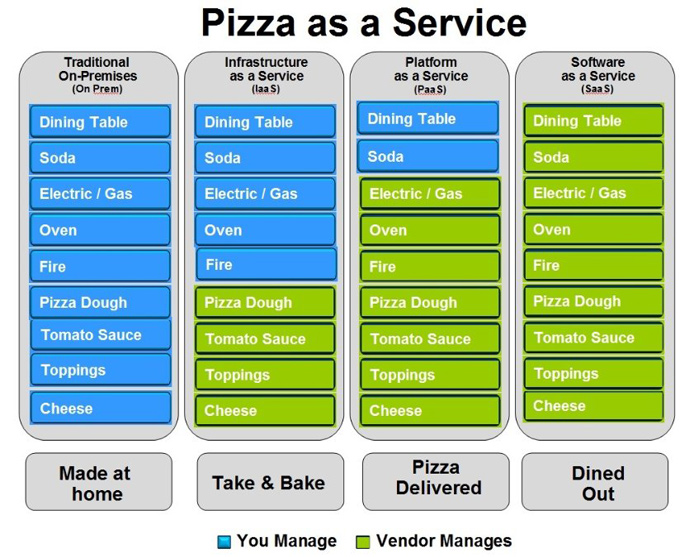
The various choices of service delivery for reference in straight pizza talk.
Where you want to place yourself in the cloud offerings wildly depends on your appetite for trouble/fun and time at hand. Using a fully managed SaaS does offer a more no-nonsense approach with a ‘glove-that-fits 90%’ methodology.
Choosing on the shelves of Lightsail
A few different options are available when starting of with AWS Lightsail, first and foremost, how much you are willing to spend on your pet project. The smallest plan will most likely suffice for most smaller webservers are other custom servers. Also note that the first fix is for free….
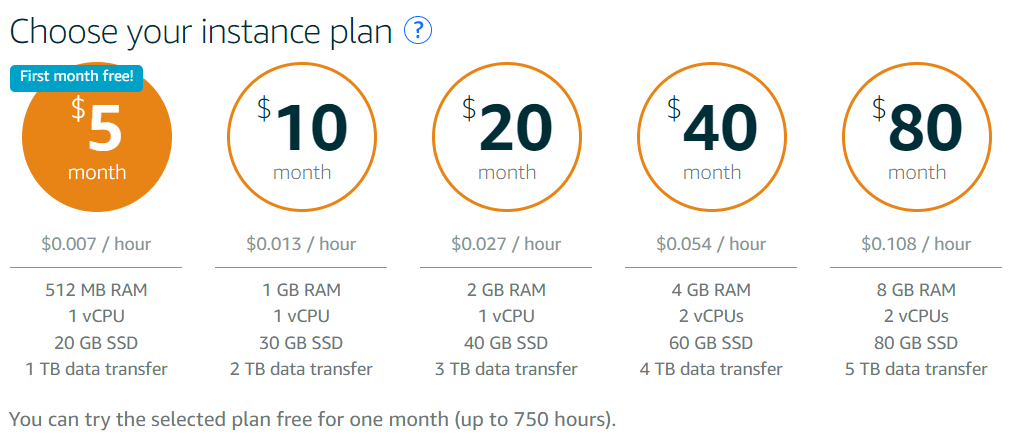
There are a few options when it comes to plans. I went with the cheapest one as it more the sufficed for my two weekly visitors (I’m looking at you). Switching plans later in is not entirely trival (You will have to mount a snapshot copy onto a new instance) but can be done.
The Next thing to decide upon is how lazy your are want to be in your deployment. Aka. do you want only an OS and a DIY solution or a prebuild distribution. I went with the latter as I image someone else probably is better at trimming an OS and doing an initial installation.
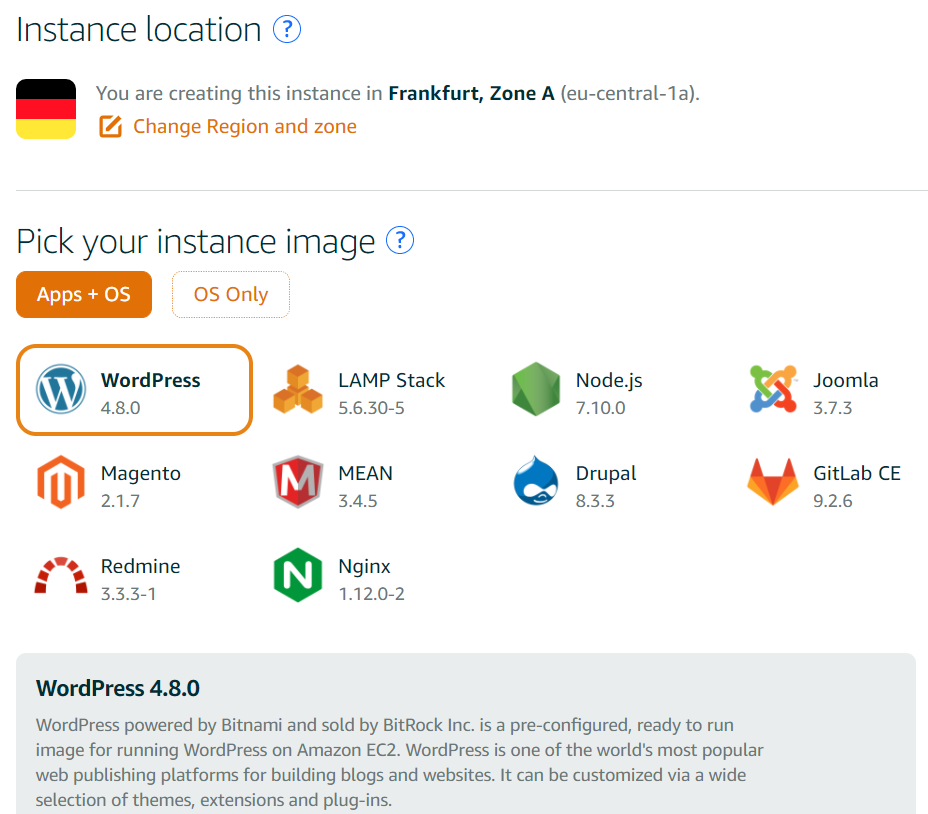
A short list of the pre-configured images. Again I took the short road and chose the pre-configured WordPress
Afterwards I only needed to login though SSH to see my unique username/password and update an A record in my DNS domain settings.
Curiously enough the Bitnami distribution is based on an older 14.4 Ubuntu. Its not really a problem as it is still patched and maintained but still odd.
The Lightsail console
The AWS Lightsail is a more simplistic offering, but still powerful enough to drive even somewhat demanding sites. It is arguably mostly suited for single server applications, but there is nothing hindering the use of a fleet of instances (though you will likely be better of in EC2).
The console provides fast access to all features I can image being of interest. My instance here is the smallest available and running with (512MB RAM, 1 vCPU and 20GB of SSD and a public IP). This instance type costs $5 a month.
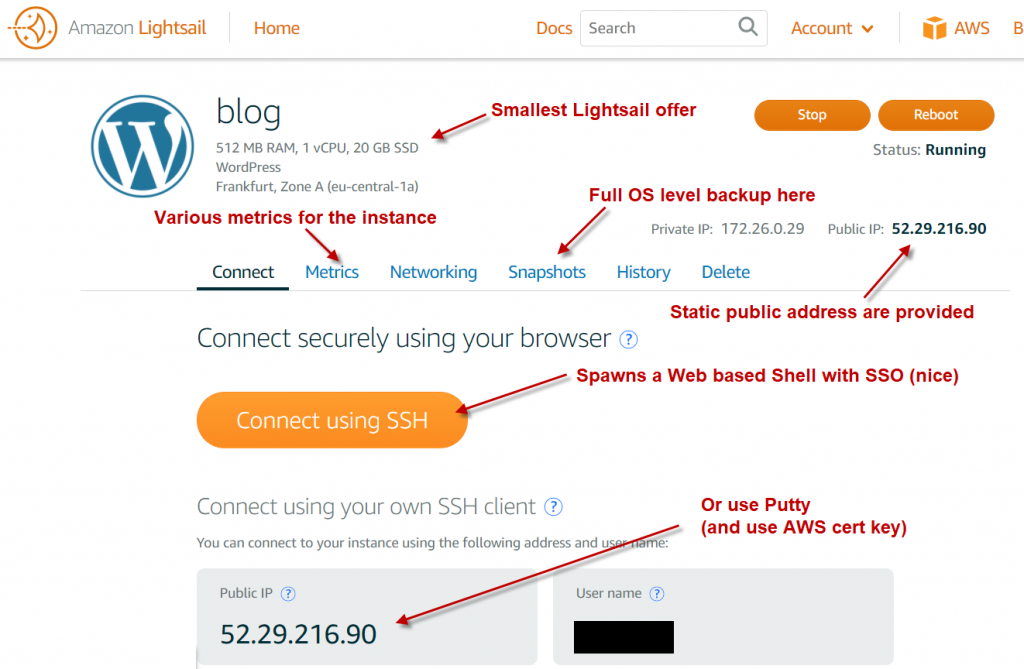
Look and feel of the Lightsail dashboard. Most buttons are quite self-explainable. But I will highlight both the in-browser terminal, which makes CLI access easy and the snapshot capability in order to provide backups for different points in time (can be automated).
The instance are “protected” by somewhat crude ACL style firewall rules, however only incoming ports are applicable as options. By default when choosing the WordPress AMI three ports are open for public access. All services running on the OS on these ports however has been locked down and has unique User/Password combinations.
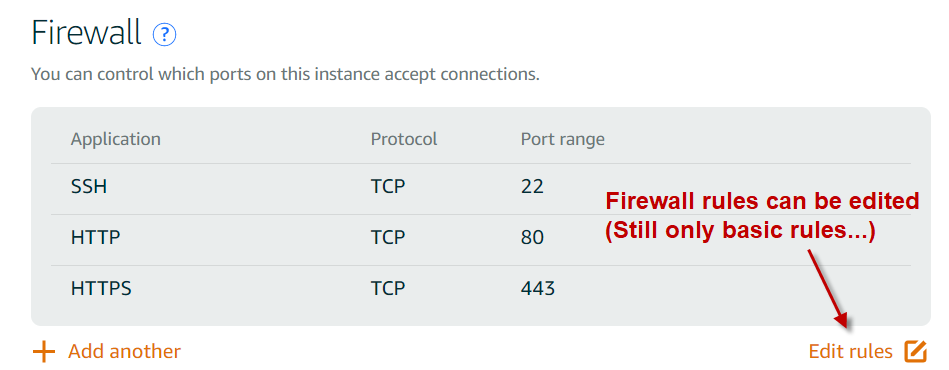
Firewall rules attached directly to the server. They are somewhat crude but effective. I would have wished for a full 5-tuple ACL though, but I guess for simplicity this model was adopted.
The joys of shell access
There are alot of benefit by being able to log into a console. I had a few things in mind when choosing the solution.
- I really wanted to be able to utilize Lets-Encrypt SSL certificates. This requires an agent on the OS in order to mint a usable (and free) certificate.
- I wanted direct access to the data and database.
If you don’t need shell access (or it can be done though WordPress plugins)? Goto wordpress.com instead for a full SaaS solution.
Getting Lets-Encrypt working
Lets-Encrypt provides free short-term SSL certificates which are most often trusted by browsers. It uses a very simple form for verification that you in-fact own the domain you are requesting a certificate for by installing a light-weight agent onto the system (which also handle the frequent renewal of certificate).
Getting it running is fairly easy and is also somewhat covered by the general Bitnami documentation.
Start by firing up an SSH client (either the AWS web client or a Putty). Putty is prefereble due to copy-paste limitations on the AWS client.
You will first need to install Git for the code download
sudo apt-get install git
Chose a place for the software to be downloaded to
cd ~/certbot
git clone https://github.com/certbot/certbot
Go into the directory and run the initial install
cd certbot
./certbot-auto
Create the certificate (replacing www.staffeldt.net with your actual domain)
./certbot-auto certonly --webroot -w /opt/bitnami/apps/wordpress/htdocs/ -d www.staffeldt.net
Now the certifcate is created it needs to be linked to the Apache server. This is done by replacing (first two lines backs up the old certifcates) the default certificates in the store
mv /opt/bitnami/apache2/conf/server.crt server.crt.old
mv /opt/bitnami/apache2/conf/key.crt skey.crt.old
sudo ln -s /etc/letsencrypt/live/www.staffeldt.net/fullchain.pem /opt/bitnami/apache2/conf/server.crt
sudo ln -s /etc/letsencrypt/live/www.staffeldt.net/privkey.pem /opt/bitnami/apache2/conf/server.key
Lastly Apache needs to be restarted
sudo /opt/bitnami/ctlscript.sh restart apache
The certificates are only valid a short while why it is also necessary to create recurring refreshes of the certificate. This can be done through Cron (command starts an editor)
crontab -e
adding the following Cron line will try to update it once a week (and the Certbot should update the certificate when there are only 30 days or less left of the Certificate lifespan)
0 5 * * 1 /home/bitnami/certbot/certbot-auto renew
That is it 🙂
(update) I forgot to mention that the default installation of WordPress on Lightsail is open on both TCP/80 and TCP/443. In order to redirect all traffic to an SSL connection either use an Apache rewrite rule or just shutdown the ACL opening for port 80 in the Lightsail networking tab.
With great power comes great responsibility
The drawbacks of full OS control is that you are also responsible for securing and patching the instance.
Ensure that you have enable auto-updating of the OS…
sudo dpkg-reconfigure --priority=low unattended-upgrades
More in depth on hardening the OS (10 min hardening) can be found here
Be the first to comment on "WordPress in the Cloud"